Monday, February 17, 2014

"No Sew" Curtain Panel Shortening DIY

"No Sew" Curtain Panel Shortening can be done by just about anyone.  I say this because I do not sew well and I did one panel while my son took his noon nap.

I used:
  • IKEA white 95" curtain's 
  • scissors
  • Stitch Witchery, one roll (purchased at Joann Fabric's)
  • sewing pins
  • iron
Step 1: Measure and cut off the access material.  Fold and pin the area that you want your fold at the bottom.  Make sure you live material to fold and iron on the Stitch Witchery.
Step 2: Iron the fold to make sure the crease is where you want it. 
Step 3:  Add the Stitch Witchery inside your fold and pin again to secure the mess.
Step 4:  Iron again using steam for about 10 seconds. Use the directions on the box of Stitch Witchery. (Below are the instructions off the Stitch Witchery Roll I purchased.)

Step 5: roll material one more time, pin and iron on the Stitch Witchery one more time.  This is if you want a professional look.  (I skipped this step because my son got up from his nap and was crying.)

Step 6: Hang your curtain's.

I will be using a steamer to iron the curtains, but I have to wait until my son goes to sleep. 
I will be using the access material to "No Sew" on the new curtains that I bought which are about 5" too short. 


Great Deal on Sunday Paper going on NOW!!!

I enjoy couponing and clearance shopping!

It lets me buy more with less money.  This is important to me since I am a stay at home mom and we are a one income household.

******  Have the Sunday Paper delivered!  I get four copies of the Sunday Tribune Paper. (I have 2 accounts with them).  This is the cheapest way to get the Sunday coupon inserts.  You can ask family who get the paper to give you the inserts or dumpster-dive but for me its super easy to just have them delivered.

Chicago Tribune home delivery service is a convenient way to have newspaper inserts and coupons delivered right to your home. You can order up to two additional Sunday papers with specially-tiered pricing to maximize your couponing power, and it's even cheaper than buying your papers at the dollar store. (Plus, they're delivered to your door!)
Call 1-855-438-8742 to subscribe with any of the following codes:
Single Copy Offers Discount code Price
Sunday Edition, 1 copy JCSO .75/week
Wednesday and Sunday delivery, 1 copy JCWS $1.49/week
Multiple Copy Offers* Discount code Price
Add 1 Sunday Edition JCX1 .75/week
Add 2 Sunday Editions JCX2 $1.99/week
*Maximum 3 Sunday copies per address, within the Tribune's delivery area. Length of offer is 26 weeks of delivery.
Again, these are PHONE-ONLY offers. You cannot use these codes to sign up online, as the online system is only set up for one subscription. Call 1-855-438-8742 if you'd like to order. Do NOT try to use these codes at 1-800-TRIBUNE, as they will not work. You need to use this special phone number for this offer.
Now I know I do not have to explain what I great deal this is. The lowest you can purchase the paper for is $1 at Dollar Tree, Dollar General or Menard’s. The Chicago Tribune is the best paper around here for coupons.
Use just one or two coupon in each paper and you have already saved money!


Sunday, February 16, 2014

Diaper Cake DIY for a baby girl

I wanted to share the 1st diaper cake I made.  I looked at over 10 how to videos on you tube and different designs on Pintrist. This is what I created and I wanted to share some tips to make it easy and fun.

Tips from the bottom going up:

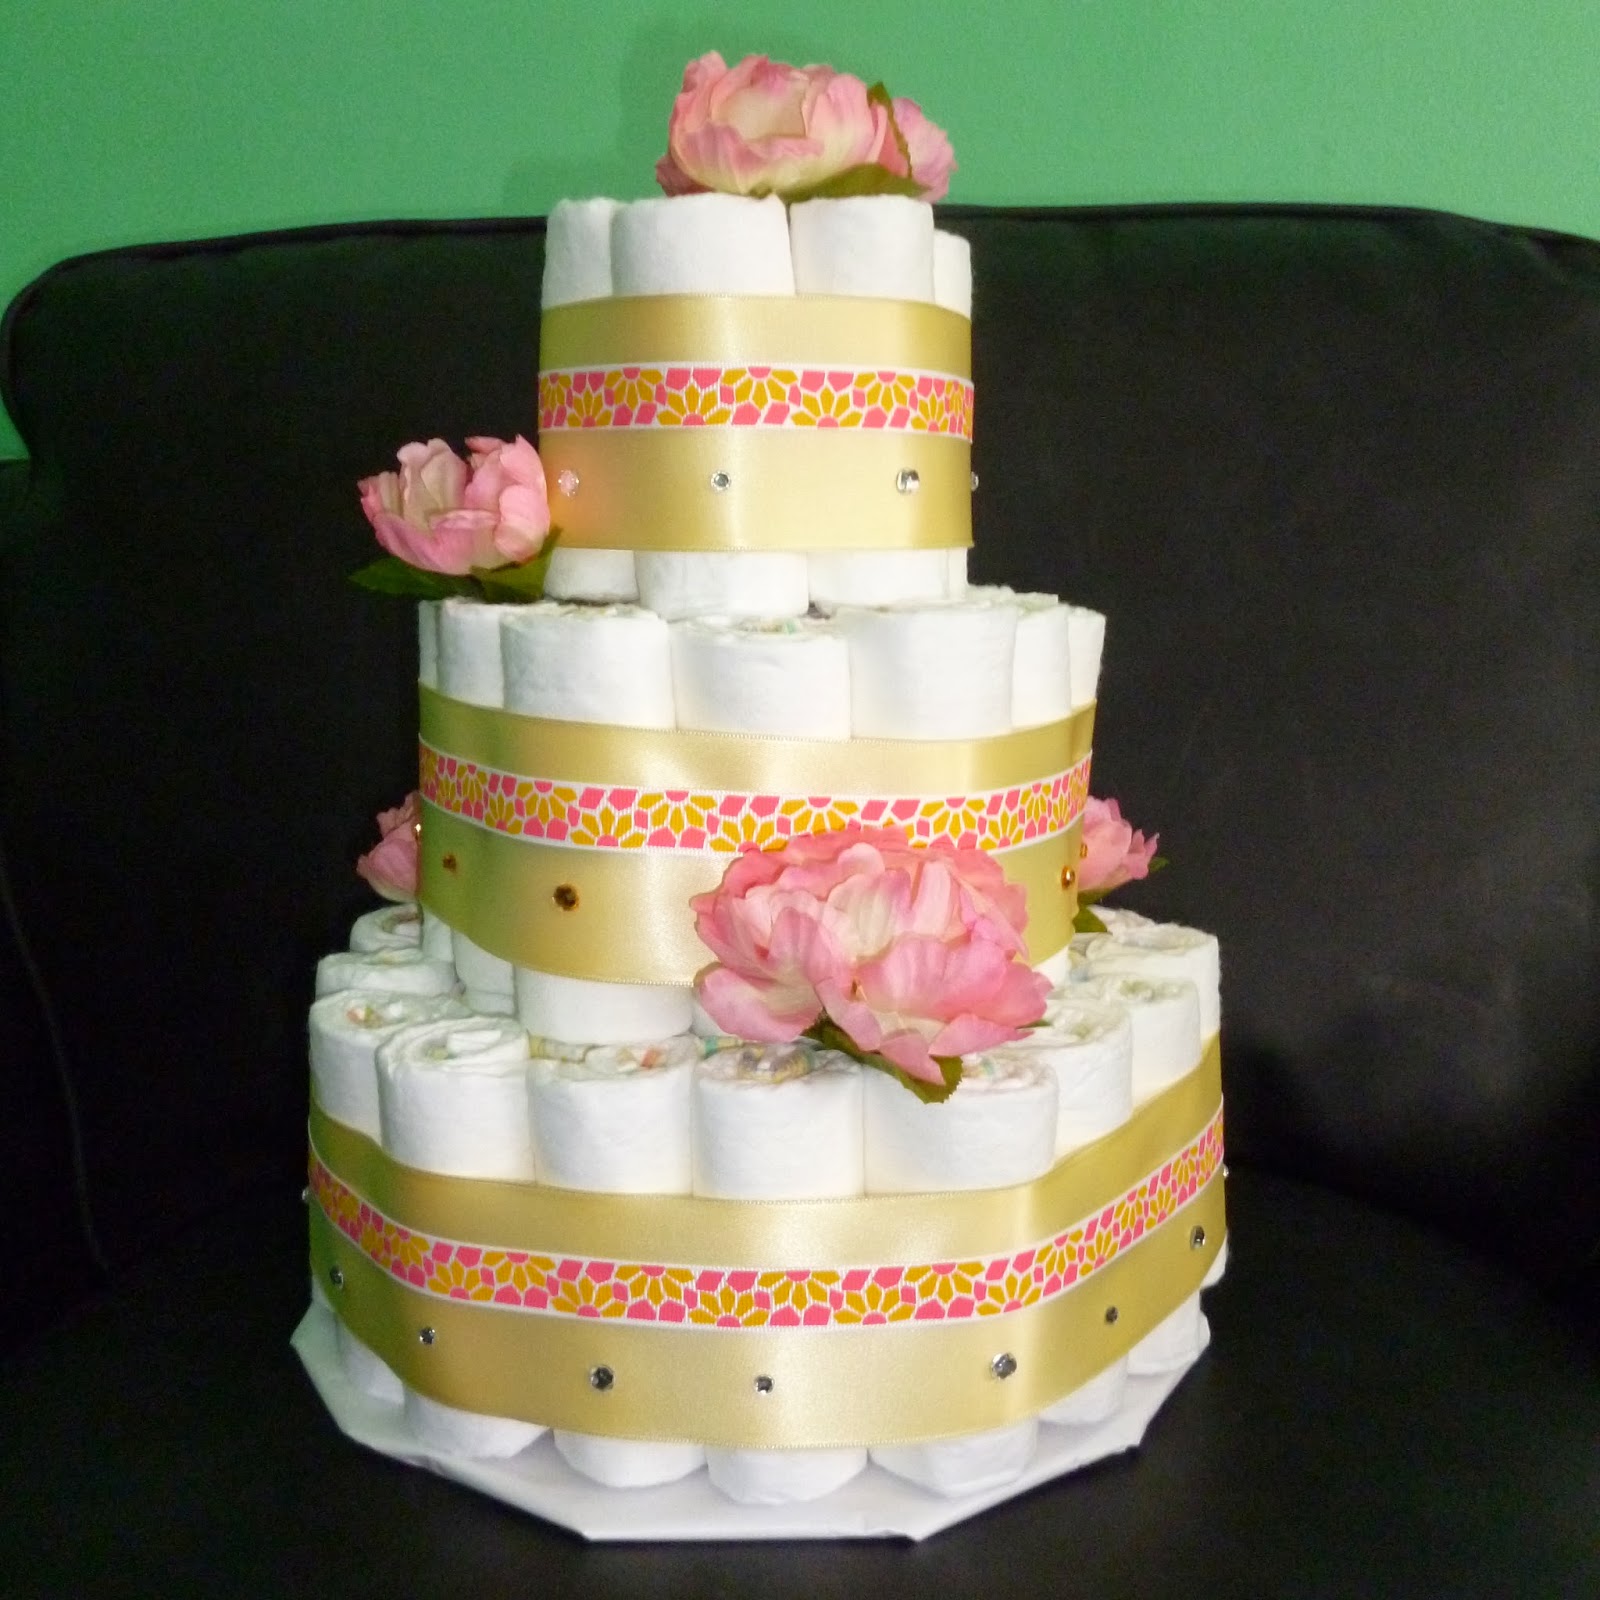
1.  The bottom plate was made from the diaper box.  I traced a circle 11 inches round and cut it out. Then I took white tissue paper and covered the cardboard.  Taped it down and the plate is ready and free!
(Tip:  I always buy tissue paper on clearance after big holidays.  I end up using it all year long and its always at a 70% to 80% discount.)

2.  I used a paper towel roll for the inside to stabilize the diaper cake.  This is a good way to recycle! This video shows how the paper towel roll is used:
http://www.youtube.com/watch?v=9XH1B2OpoeA
 But I rolled my diapers using this video.  They look the best!!! I tried a few ways to find what works the best.
 Used this video:  http://www.youtube.com/watch?v=PuibjjzW93I
 (Tip:  I rolled my diapers a day before I made the cake.  it made the act of putting together and decorating more fun!)

Also, you can use other items inside the cake depending on what you are looking to spend.  My favorite idea is using a bottle of wine.  A surprise for the mom when she takes it apart.

3.  The Diapers are a size 3 Pampers.  I used about 60 for this cake.  Following the 6, 12 ,18 rule.  6 in the first circle, 12 around and 18 following that for the bottom.  Next tier is 6 then 12 round.  The top tier 6. (Tip:  I wait until I find the diapers on super sale.)

4.  Any rubber bands will do.  I used the same size on all layers, they stretched super well.  You can buy this from the dollar store.  I used once that I got from a trade show from years back and they worked great.  The ribbon will cover any color.  Mine was green and the ribbon covered it great, but I needed 2 layers of ribbon to cover  the robber band perfectly.  Which is fine since I was going to use two anyway.

5. Once the cake is ready, it's time to decorate.  This is the part that scared me the most.  I had so may ideas on what to do.  I also had a lot of props that I didn't end up using. 

Ribbon:  I used colors I found in the dollar section at Michaels.  (Tip: Check the dollar section before you pay a lot for ribbon.)
Use a glue gun to secure the ribbon.  This worked best for me.  There are other methods if you don't have a glue gun, such as safety pins.

Flowers:  I used a branch of fake flowers from Michales.  They are $1.99 for the branch of 5 or 6 flowers.  I cut them off the branch and places the stem in the diapers so the flowers stay put.

The diamonds are stick on from Michaels.  I wait until I find items like this on clearance.  I got them for 30 cents months earlier.

I ended up putting the diaper cake in a large gift clear plastic bag.  This will keep the diapers clean and make it look for professional.

And now you have a diaper cake that looks like this:


Friday, February 7, 2014

DIY Project- Tissue Paper Pom-Poms

This is my first post, I made a Tissue Paper Pom-Pom.  This was a test run for my Baby Sprinkle Party. I will be having a girl early June and am looking for great DIY projects to make the party look expensive with a stay at home mom budget.
Below is the you tube tutorial I used. 
http://www.youtube.com/watch?v=LgeHGG-4EI8
Add caption


I will make a lot more. I want to use them for the nursery and for the party.

Thank you for reading.
Ewa+